What this is about :
The following article will guide you through a process by which external hard disk is converted into powerful system for booting Windows PE, OS X installer, Linux Live Systems and making backups of those systems.
Objectives.
Converting External Hard Drive
- To boot Windows PE or Rescue disk for repair and installation of Windows
- To boot Various Linux Distributions and try Live Sessions and if desired installation, even backup and repairing systems
- To boot OS X installer, use disk for Time Machine and even have Recovery HD
- Yeah A separate Data Partition.
Requirements:
Absolute
- A device running Windows in UEFI
- An External Hard Disk
- Linux(I prefer Ubuntu) on USB or on a partition
- Windows PE (Rescue Disk) or Create ONE
Optional
- Macintosh or Hackintosh
- Linux ISO collections
Let’s Start:
If you have a new external hard disk without data then you can skip step 1 and 2 .
Step 1: (Work on Windows or Windows PE)
Preparing Windows for converting External Hard disk from MBR to GPT.
You can either install the app mention in step 2 or use Rescue Disk mentioned in Requirements. Following strange guidelines is to use boot.wim from Rescue Disk or WinPESE you created and boot from your windows installation rather than burning the iso or making bootable usb. Since We are going to make bootable external hard disk later, for the time being we will be using our windows installation. If you always want the rescue disk on your PC you can make a partition and keep the boot.wim file there ( which will be discussed later), the procedure is same for PC and External Hard disk. For now we will be using Windows native reagentc.exe to point to boot.wim, nay , winre.wim to boot the rescue disk which is actually a RAM disk.
First mount the WindowsPE/Rescue Disk. Browse to /Sources then copy the boot.wim somewhere. Then rename boot.wim to winre.wim.
Then check your current recovery environment variables using reagentc
open command prompt in Administrator Mode and type
reagentc /info
If it is Enabled with winreimage and winosimage then copy all the contents in notepad and keep it somewhere safe. You need it to revert back later. We will disable it first so that we can use our changed winre.wim file as our recovery environment. For disabling type the following commands
reagentc /disable
Now create a new folder Recovery then WindowsRE inside that Recovery then put winre.wim inside that WindowsRE folder. Assuming you did that in your C: Drive then it will look like this
C:\Recovery\WindowsRE\winre.wim
Now setting this recovery environment for our current system.Type following in command prompt as Administrator ( I hope the window is still open)
reagentc /setreimage /path C:\Recovery\WindowsRE /target C:\Windows
Check the Change and Enable with Following Commands
reagentc /info
reagentc /enable
You are ready to boot to these image(winpe) pressing F8 while booting or from inside update and recovery in system settings and then to recovery environment. I keep my bootmenupolicy as legacy so that access to my internal winpe partition and F8 is easier.
Commands to Change bootmenupolicy Legacy and Standard Respectively
bcdedit /set {default} bootmenupolicy legacy
bcdedit /set {default} bootmenupolicy standard
Later you might want to revert back to your original recovery environment and factory image though we haven’t touch the image part , yet the following example is just for the reference on how to do it. Use your notepad backup as guidance for hard disk volume and partition , first disable reagentc then issue commands to direct to your original environment and enable. In a sequence it will be like this.
reagentc /disable
reagentc /setreimage /path \\?\GLOBALROOT\device\harddisk0\partition11\Recovery\WindowsRE /target C:\Windows
reagentc /setosimage /path \\?\GLOBALROOT\device\harddisk0\partition12\Ten /index 1 /target C:\Windows
reagentc /enable
Note: If you are unable to return then you might need to delete boot.sdi from your recovery partition inside WindowsRE. Such a hassels just to run few apps from Rescue Disk 😉
Step 2: (Work on Windows or Windows PE)
Preparing External Hard disk as GPT for further formating:
For the purpose of our objectives we need to have External Hard disk in GPT mode. If you have a new hard disk without any data in it you can proceed but let’s not start right away. If your external hard disk is in mbr format then we have to convert it into gpt mode.
How to Check whether Hard disk is in MBR or GPT mode.
- Using Windows native Diskpart (more info on diskpart ) Command
Open CMD in Administrator mode and type
diskpart
list disk
If there is asterisk below gpt then the hard disk is in GPT mode or else is in MBR.
You can also use Gparted (Linux) or AOMEI Partition Assistant (Windows) , These two will be used extensively in later parts which are also present in the requirements as mentioned above in Ubuntu and Rescue Disk respectively.
Converting MBR Disk to GPT Disk without data loss.
So if you have a hard disk in MBR format and gigabytes of data in it then consider using AOMEI Partition Assistant.If you have partitions then move the data into single partition and delete other partitions or merge partitions and create one whole partition. Then you can convert your disk to gpt using AOMEI Partition Asssistant without losing data.
Learn to Convert MBR Hard Disk to GPT without Data Loss through Powerful Software
Step 3 (Work on Windows or Windows PE)
Now after converting to GPT or if you have new disk then Convert it with following command in cmd ,open as Administrator . diskpart ,list disk, let’s say disk 1 is your external hard disk, then select disk 1 , convert gpt . Assuming DISK 1 as external disk you want to use, issue following commands
diskpart
list disk
select disk 1
convert gpt
Step 4 (Work on Linux or Gparted Live)
Formating and Changing Partitions on External Hard disk.
Plan:
Partition 1: EFI System Partition 500MB Fat32
Partition 2:WinPE and Image(Factory) Backup 25GB NTFS
Partition 3:Lots of Linux ISOes and Grub etc 25GB EXT4
Partition 4:OSX install and Recovery HD 10GB HFS+
Rest As you desired. But for the above We need around 61GB. If you are ready to sacrifice around 61 GB from your external hard disk , you can proceed further. If you have data on your hard disk then first create 61 GB of free space in front of hard disk. For that use AOMEI Partition Assistant. Use resize/move function it will create free space in both front and after. Create 61GB of free space in-front first and apply. Later you can extend your data partition to use the free space created after your previous partition.Assuming that you have 61GB of free space in-front or new hard disk without data , let’s format it to our need.
Step 5 (Work on Linux or Gparted Live)
Using Gparted to format at once for all our needs. Here we need either Ubuntu live session on USB or Gparted live or Linux on partition with Gparted installed. For creating hfs partition you might need to install hfsprogs or hfsutils. Check the distribution and gparted in it.
Lets format our 61GB with Gparted:
If hard disk is new and unformatted then first partition table should be created. Use device menu from gparted and create partition table and choose partition table type as gpt. Then apply it. If already converted from mbr to gpt then create partitions as follows. Select right disk on right top corner, don’t format internal disk.
select unallocated space and right click and new.
new size put 500mb and on file type choose fat32 then add
Again new and size 25GB i.e 25600MB and file type NTFS add
Again new and size 25GB i.e 25600MB and file type EXT4 add
at last new and size 10GB i.e 10240MB and file type HFS+ add
You can add label as ESP, WinPE, UnixPE, OSXPE whatever you want during formatting
Then apply. Note if you have moved partition to create 61GB then at last use all space instead of 10GB. If the hard disk is new then the rest unallocated space can be formatted as you like.
After Formatting Select the first partition Fat32 and right click to manage flags, then select esp and boot and close it.
Step 6 (Work on Windows or Windows PE)
Creating bootable WinPE and if desired Moving Factory Image(or install.wim) on 2nd Partition
Walkthrough: Boot Windows PE from a UEFI-based Hard Disk
For the copy paste convenience we will assign and change drive letter. First attach your external hard disk in Windows. The first partition will not be mounted. Let’s mount it and assign letter to it using Diskpart. This commands assumes it is disk 1 in list disk command in diskpart.Also let’s change the 2nd NTFS partition drive letter to T from disk management.First change the drive letter of second partition then mount first partition as drive S with following commands
diskpart
list disk
sel disk 1
list part
sel part 1
assign letter=S
Mount your winpe media or Rescue Disk that you downloaded. Now create a folder Sources in second partition. Copy boot.sdi from \boot\boot.sdi of rescue disk to Sources folder. Also copy boot.wim from sources folder of rescue disk to Sources folder of second partition.
Now Set up EFI System on External Hard disk. Copy EFI folder from Rescue disk to 1st partition or ESP partition. Then Copy other required boot files from your windows installation to your new ESP Partition with copy using following commands in Administrator CMD
copy C:\windows\boot\EFI\*.efi S:\EFI\Microsoft\Boot\*
Now delete the BCD file from new ESP partition
del S:\EFI\Microsoft\Boot\BCD /f
Now we are ready to create New BCD file for our WinPE. Assuming ESP is mounted as S and your First Partition is Mounted as T. Either copy paste the following commands at once or issue one after another. There should not be any error.All should be operation completed successfully
bcdedit -createstore S:\EFI\Microsoft\Boot\BCD
bcdedit -store S:\EFI\Microsoft\Boot\BCD -create {bootmgr} /d “Boot Manager”
bcdedit -store S:\EFI\Microsoft\Boot\BCD -create {globalsettings} /d “globalsettings”
bcdedit -store S:\EFI\Microsoft\Boot\BCD -create {dbgsettings} /d “debugsettings”
bcdedit -store S:\EFI\Microsoft\Boot\BCD -create {ramdiskoptions} /d “ramdiskoptions”
bcdedit -store S:\EFI\Microsoft\Boot\BCD -create /d “Windows PE” -application osloaderThe Last commands Returns GUID value for Winpe store, Use it in Following Command
bcdedit -store S:\EFI\Microsoft\Boot\BCD /default
After this Just Copy Paste the following commands.
bcdedit -store S:\EFI\Microsoft\Boot\BCD -set {bootmgr} device partition=S:
bcdedit -store S:\EFI\Microsoft\Boot\BCD -set {bootmgr} path \EFI\Microsoft\Boot\bootmgfw.efi
bcdedit -store S:\EFI\Microsoft\Boot\BCD -set {bootmgr} locale en-us
bcdedit -store S:\EFI\Microsoft\Boot\BCD -set {bootmgr} timeout 10bcdedit -store S:\EFI\Microsoft\Boot\BCD -set {Default} device ramdisk=[T:]\sources\boot.wim,{ramdiskoptions}
bcdedit -store S:\EFI\Microsoft\Boot\BCD -set {Default} path \windows\system32\winload.efi
bcdedit -store S:\EFI\Microsoft\Boot\BCD -set {Default} osdevice ramdisk=[T:]\sources\boot.wim,{ramdiskoptions}
bcdedit -store S:\EFI\Microsoft\Boot\BCD -set {Default} systemroot \windows
bcdedit -store S:\EFI\Microsoft\Boot\BCD -set {Default} winpe yes
bcdedit -store S:\EFI\Microsoft\Boot\BCD -set {Default} nx optin
bcdedit -store S:\EFI\Microsoft\Boot\BCD -set {Default} detecthal yes
bcdedit -store S:\EFI\Microsoft\Boot\BCD -displayorder {Default} -addfirst
bcdedit -store S:\EFI\Microsoft\Boot\BCD -set {dbgsettings} debugtype Serial
bcdedit -store S:\EFI\Microsoft\Boot\BCD -set {dbgsettings} debugport 1
bcdedit -store S:\EFI\Microsoft\Boot\BCD -set {dbgsettings} baudrate 115200
bcdedit -store S:\EFI\Microsoft\Boot\BCD -set {ramdiskoptions} ramdisksdidevice partition=T:
bcdedit -store S:\EFI\Microsoft\Boot\BCD -set {ramdiskoptions} ramdisksdipath \sources\boot.sdi
Your computer is now ready to boot Windows PE directly from the External hard disk. Now you can even move your Recovery Image (Factory Image) or install.wim and use reagentc to point to these files. Or use winpe to install these images.
Step 7 (Work on Linux or Ubuntu Live)
Backgrounds: Multiboot USB Drive Grub2/ISOBoot
Creating Linux bootable Partition, the third partition and testing various ISO from that Partition. You might not be able to create any folder on your partition created by gparted. It depends. Either you have to take the permission or use nautilus with sudo. First mount Ubuntu ISO with disk mounter. If it is not visible then go to disks application and mount the loop from there. Then open nautilus as root. If in live system, just type
sudo nautilus
Then copy the boot and efi folder from your Ubuntu ISO to third Partition.
Now let’s prepare to install grub-efi on external hard disk
if any partition is mounted unmount from nautilus or disks
Then mount our custom partitions in following order, assuming your external hard disk is at sdb, do check with disks or gparted.
Let’s First Mount the ESP Partition of External Hard disk with following command in terminal as root
mount /dev/sdb1 /mnt
Make a boot directory in /mnt
mkdir /mnt/boot
Then mount your 3 partition in that boot directory using
mount /dev/sdb3 /mnt/boot
Now install grub with following commands
grub-install –target=x86_64-efi –efi-directory=/mnt –boot-directory=/mnt/boot –removable –recheck
After installing grub you can unmount the partitions with following commands
umount /dev/sdb3
unmount /dev/sdb1
Now make a folder name ISO inside boot folder in 3rd partition. Then you can keep your Linux Live image ISO collection there. Now we need to edit the grub.cfg in /boot/grub folder in our third partition.
Here is the example grub.cfg which I am using
# Graphics Loading
if loadfont /boot/grub/fonts/font.pf2 ; then
set gfxmode=auto
insmod efi_gop
insmod efi_uga
insmod gfxterm
terminal_output gfxterm
fi# Setup theme
set timeout=5
set gfxmode=auto
insmod gfxterm
terminal_output gfxterm
loadfont /boot/grub/fonts/dejavu-sans-12.pf2
loadfont /boot/grub/fonts/dejavu-sans-bold-14.pf2
loadfont /boot/grub/fonts/unicode.pf2
insmod gfxmenu
insmod png
set theme=/boot/grub/themes/madmedicos/theme.txt# Menuentry Settings
menuentry “Ubuntu Live” {
set root=(hd0,3)
linux /casper/vmlinuz.efi boot=casper ignore_uuid
initrd /casper/initrd.lz
}
submenu “Ubuntu/Debian Based Live OS”{
menuentry “Kylin Live Unity” {
set root=(hd0,3)
set isofile=”/boot/iso/ubuntukylin-16.04.1-enhanced-amd64.iso”
loopback loop (hd0,3)$isofile
linux (loop)/casper/vmlinuz.efi boot=casper iso-scan/filename=$isofile noprompt noeject quiet splash —
initrd (loop)/casper/initrd.lz
}
menuentry ‘Debian Live Mate’ {
set root=(hd0,3)
set isofile=’/boot/iso/debian-live-8.6.0-amd64-mate-desktop.iso’
loopback loop $isofile
linux (loop)/live/vmlinuz boot=live config findiso=${isofile} quiet splash —
initrd (loop)/live/initrd.img
}
menuentry ‘Linux Mint Live Cinnamon’ {
set root=(hd0,3)
set isofile=”/boot/iso/linuxmint-17.3-cinnamon-64bit.iso”
loopback loop $isofile
linux (loop)/casper/vmlinuz boot=casper iso-scan/filename=$isofile liveimg noprompt noeject quiet splash —
initrd (loop)/casper/initrd.lz
}
menuentry ‘Elementary OS Freya’ {
set root=(hd0,3)
set isofile=”/boot/iso/elementaryos-stable-0.3.1-amd64.20150903.iso”
loopback loop $isofile
linux (loop)/casper/vmlinuz boot=casper iso-scan/filename=$isofile liveimg noprompt noeject quiet splash —
initrd (loop)/casper/initrd.lz
}
menuentry “Deepin Live DDE” {
set root=(hd0,3)
set isofile=”/boot/iso/deepin-15.3-amd64.iso”
search –set -f $isofile
loopback loop $isofile
linux (loop)/live/vmlinuz boot=live union=overlay live-config findiso=${isofile} locales=zh_CN.UTF-8 quiet splash nomodeset
initrd (loop)/live/initrd.lz
}
}
submenu “RPM Based Live OS”{
menuentry “Rosa Live KDE” {
set root=(hd0,3)
set isofile=’/boot/iso/ROSA.FRESH.KDE.R8.x86_64.uefi.iso’
loopback loop $isofile
linux (loop)/isolinux/vmlinuz0 root=live:LABEL=ROSA.FRESH.KDE.R8.x86_64 iso-scan/filename=$isofile ro rd.live.image quiet rd.luks=0 rd.md=0 rd.dm=0 rhgb splash=silent logo.nologo
initrd (loop)/isolinux/initrd0.img
}
menuentry “Fedora Live Gnome” {
set isofile=’/boot/iso/Fedora-Workstation-Live-x86_64-25-1.3.iso’
loopback loop $isofile
linux (loop)/isolinux/vmlinuz root=live:CDLABEL=Fedora-WS-Live-25-1-3 iso-scan/filename=$isofile rd.live.image quiet
initrd (loop)/isolinux/initrd.img
}
menuentry “Gentoo Live Plasma” {
set isofile=’/boot/iso/livedvd-amd64-multilib-20160704.iso’
loopback loop $isofile
linux (loop)/isolinux/gentoo root=/dev/ram0 init=/linuxrc aufs looptype=squashfs loop=/image.squashfs cdroot isoboot=$isofile vga=791 splash=silent,theme:default console=tty0
initrd (loop)/isolinux/gentoo.xz
}
menuentry “Manjaro Live Xfce” {
set root=(hd0,3)
set isofile=”/boot/iso/manjaro-xfce-16.08-x86_64.iso”
set mlabel=”MJRO1608″
set archi=”x86_64″
set dri=”nonfree”
search –no-floppy -f –set=root $isofile
probe -u $root –set=abc
loopback loop $isofile
linux (loop)/manjaro/boot/$archi/manjaro img_dev=UUID=$abc img_loop=$isofile misobasedir=manjaro misolabel=$mlabel nouveau.modeset=1 i915.modeset=1 radeon.modeset=1 logo.nologo overlay=$dri $dri=yes
initrd (loop)/manjaro/boot/$archi/manjaro.img
}
menuentry “openSUSE 42.2 DVD” {
set root=(hd0,3)
set isofile=/boot/iso/openSUSE-Leap-42.2-DVD-x86_64.iso
loopback loop $isofile
linux (loop)/boot/x86_64/loader/linux install=hd:$isofile
initrd (loop)/boot/x86_64/loader/initrd
}
}
submenu “Rescue Partition & Cloning Tools”{
menuentry “Parted Magic” {
set root=(hd0,3)
set isofile=”/boot/iso/pmagic_2016_10_18.iso”
loopback loop $isofile
linux (loop)/pmagic/bzImage64 iso_filename=$isofile load_ramdisk=1
initrd (loop)/pmagic/initrd.img (loop)/pmagic/fu.img (loop)/pmagic/m64.img
}
menuentry ‘System Rescue CD’ {
set root=(hd0,3)
set isofile=”/boot/iso/systemrescuecd-x86-4.9.0.iso”
loopback loop $isofile
linux (loop)/isolinux/rescue64 setkmap=us isoloop=$isofile
initrd (loop)/isolinux/initram.igz
}
menuentry “Clonezilla Live” {
set root=(hd0,3)
set isofile=”/boot/iso/clonezilla-live-20161121-yakkety-amd64.iso”
loopback loop $isofile
linux (loop)/live/vmlinuz boot=live union=aufs nolocales noprompt gfxpayload=800x600x16 ip=frommedia findiso=”/boot/iso/clonezilla-live-20161121-yakkety-amd64.iso”
initrd (loop)/live/initrd.img
}
menuentry “Gparted Live” {
set root=(hd0,3)
set isofile_abspath=”/boot/iso/gparted-live-0.27.0-1-amd64.iso”
set isofile_devpath=”${devroot}${isofile_abspath}”
loopback loop “(${root})${isofile_abspath}”
linux ‘(loop)/live/vmlinuz’ boot=’live’ union=’overlay’ username=’user’ config components noswap noeject toram=’filesystem.squashfs’ ip=” nosplash findiso=”${isofile_abspath}” toram=filesystem.squashfs
initrd (loop)/live/initrd.img
}
menuentry “Hiren’s boot CD Untested” {
set root=(hd0,3)
set isofile=”/boot/iso/Hiren’s.BootCD.15.2.iso”
linux16 /boot/syslinux/memdisk iso
initrd16 (hd0,3)$isofile
}
}
menuentry “Alternate Ubuntu Live Entry” {
set root=(hd1,3)
linux /casper/vmlinuz.efi boot=casper ignore_uuid
initrd /casper/initrd.lz
}
menuentry “Test memory” {
linux16 /install/mt86plus
}
Make necessary changes according to your needs and preferences.
Note:
- My first menuentry is because I rsync the whole ubuntu ISO to third partition
- (hd0,3) can be (hd1,3) which depends on USB ports used in pure uefi system and if csm is enabled then it will be either (hd1,gpt3) or (hd2,gpt3). If you fall into grub rescue then try ls command to see what it is taking.
- You can even use grub themes and submenu themes if you are too much on customization.
Step 8 (Work on OSX on Mac or Vmware or Hackintosh)
Creating Custom OSX installer and ?Recovery HD
For this purpose you need to have Install OSX in your application folder or somewhere else.I will be using install OS X El Capitan as an example. Right click on Install OS X El Capitan and select show package contents. Then to Contents>SharedSupport you will find InstallESD.dmg . Mount it or open it.
Now after mounting InstallESD.dmg open terminal and paste following commands show that all hidden files and folders are visible
defaults write com.apple.finder AppleShowAllFiles YES
then to refresh finder
killall Finder
Now you will see BaseSystem.dmg in OS X Install ESD which was mounted before. Mount it too. After that open disk utility app. Select your 4th partition and from menu list edit section select restore then from dropdown menu select OS X BaseSystem and click restore.
After completion of restore , Browse the new OS X BaseSystem from Harddisk. You can rename the name to remove confusions. Browse to /System/Installation and remove the link Packages and copy Pacakages Folder from OS X Install ESD to /System/Installation of your 4th partition.
After that copy hidden files BaseSystem.dmg AppleDiagnostics.dmg BaseSystem.chunklist and AppleDiagnostics.chunklist from OS X Install ESD to root of your 4 Partition.
Your custom OSX installer is ready. If you want to add Recovery HD then copy the folder from your Recovery HD to root of your 4th partition.
To hide again the files and folders type follwing successively
defaults write com.apple.finder AppleShowAllFiles NO
killall Finder
Unmount the dmgs you mounted.
Note: If your installation stuck on unable to extract packages from essentials.pkg or unable to verify etc then first open terminal and correct the date format with following
date 0101125017
date {month}{day}{hour}{minute}{year}
Step 9
Unifying Boot Loaders.
If you are unable to boot your systems then these boot loaders will help you. Install rEFInd Boot Manager in EFI System Partition of External Harddisk and boot all your System from it.
You Can Use the rest of the space in your hard disk as you desire.
PS:
I would have written in more depth but wordpress complains a lot about saving draft failed in browser and take me to the top of the page and the wordpress application hangs most of the time.
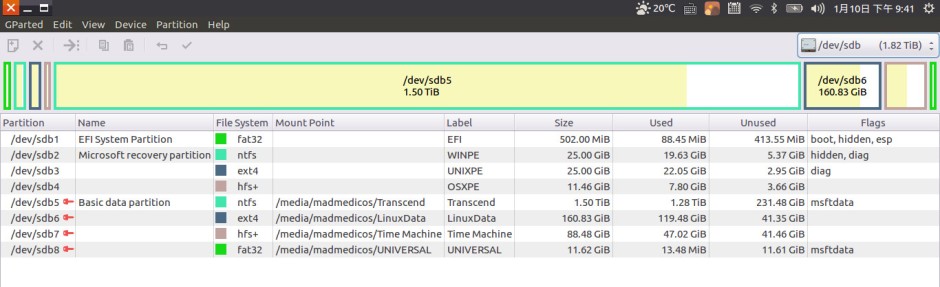
My Final Exteranl Hard Disk Layout:
Enjoy Tweaking.

Thanx. It was really helpful